The following images I took on Friday (Dec 31) morning and evening of frost on the trees. Our son's name is Hyouju which means frosted forest or trees. It was beautiful. I find it interesting how my photos seem to be compositioned similar to my painting and glass work.
This was soon after sunrise and the fog is still in the distance.
I took this pic after the fog lifted. I enjoy the color change from the pale orange to the blues.
This one I took in the evening. I love the light and shadows on the snow.
The purpose of my art is to nourish your soul through the enrichment of your surroundings with the use of customized and intentioned light, color and movement. This is achieved by creating custom stained glass windows and oil paintings.
Sunday, January 2, 2011
Saturday, January 1, 2011
"Gusty"- stained glass process
Cutting glass and piecing everything together. I tack solder some joints just to hold areas together so I can move on to the next piece. With some of the curves this piece became a little complicated in cutting and putting together.
Friday, December 31, 2010
A New Year
I hope that this new year brings joy and peace in your lives. I definitely could use that as well as reconciliation and healing. I am learning to surrender at the moment as we have moved to a new place this year and I do not know when I will be able to create glass art or paint again. I am working on restoring our marriage right now. I will keep posting glass work and paintings and talking about them. I keep up on drawing and will show those from time to time.
Happy New Year!
Happy New Year!
Labels:
art glass,
beveled glass,
drawing,
hand beveled glass,
oil painting,
Stained glass
Friday, December 24, 2010
Christmas
Merry Christmas ! I hope you all have a wonderful time.
We are going to have a quiet time at home. My son has been sick the last few days so we are hoping he gets well quickly and that we stay healthy.
Labels:
fine art,
leaded glass,
oil painting,
Stained glass
Sunday, December 19, 2010
"Gusty"- stained glass process
This image shows how I draw a line in the middle of the clear bevel and place the colored glass on top, drawing the shape onto the colored piece and cut that shape. I will then bevel the colored piece and later bond it on top of the clear bevel.
Thursday, December 16, 2010
Thursday, December 9, 2010
"Gusty"- stained glass process
The stained glass piece titled Gusty that I showed in a previous blog was a fun project to work on and I thought I would show pics of the process. This will have more details compared to the cabinet project. This shows the drawing and layout of the design and a few clear glass pieces in the upper left of the picture which will be hand beveled.
Labels:
abstract,
contemporary,
drawing,
fine art,
leaded glass,
painterly,
Stained glass
Tuesday, December 7, 2010
Light/shadow/texture- a photograph
I took this picture in CA a month ago. I love the texture and light/shadows. Inspiring for glass and painting.
Labels:
fine art,
Light,
oil painting,
Stained glass
Thursday, December 2, 2010
Living Room window
This design was fun. 2 shades of blue hand beveled and bonded on top of commercial triangle bevels. The red pieces are also hand beveled to give more light play.
Labels:
abstract,
contemporary,
fine art,
leaded glass,
Stained glass
Monday, November 29, 2010
Leaded glass panel going into cabinet door.
This is a small panel going into a kitchen cabinet door. The top image details the hand beveling on the triangles.
Thursday, November 18, 2010
Leaded glass window process, final step
Finished project installed in cabinet doors and details of the bevels. One detail about the bevels is that they are not even all the way around. I found this to add depth and dimension to the piece.
Monday, November 15, 2010
Friday, November 12, 2010
Leaded glass window process, step 10
In step 9 I showed the putty being applied. I use a horseshoe nail along the edge of the lead to clean off the excess putty. The above image shows a whiting on the glass to clean the glass, absorb oils from the putty and flux (soldering stage). The whiting also helps the putty to dry faster. The bottom panel has whiting on the backside and the top side is clean.
Tuesday, November 9, 2010
Monday, November 1, 2010
Wednesday, October 27, 2010
Leaded glass window process, step 6
This image show the zinc border on 2 sides, a beveled piece in place with a strip of lead cut and set into place on the right side of the beveled piece. The gray glass is set in with the piece drawn out, ready to be cut. Horshoe nail top left to hold frame in place.
Tuesday, October 26, 2010
Friday, October 22, 2010
Leaded glass window process, step 4 beveling
Images show stages 3 (pre-polish) and 4 (polish) of beveling. The wheel in the 2nd picture is the polishing wheel for straight edge and outside curves.
Tuesday, October 19, 2010
Leaded glass window process, step 3 beveling
These images show the first 2 stages of beveling- rough as seen on the straight edge and smooth on the inside curves. 2 more stages to go.
Saturday, October 16, 2010
Aboriginal art at WSU
I visited WSU's art gallery yesterday and was pleasantly surprised at the exhibit- Contemporary Australian Aboriginal Art. Lots of color and visual texture. Fun to learn that they use symbols which have specific meaning throughout the design and texture. An example is a horseshoe shape in the middle of a circle means woman or adult. This symbol may be repeated to create a design within the whole piece. It was fun to see this work.
Getting ready for hand beveling, step 2
The next stage is to cut the glass for hand beveled portions of the design. I draw the bevels on the glass since I do not do an even bevel all around the shape (this is explained in a previous blog).
Labels:
beveled glass,
hand beveled glass,
leaded glass,
Stained glass
Wednesday, October 13, 2010
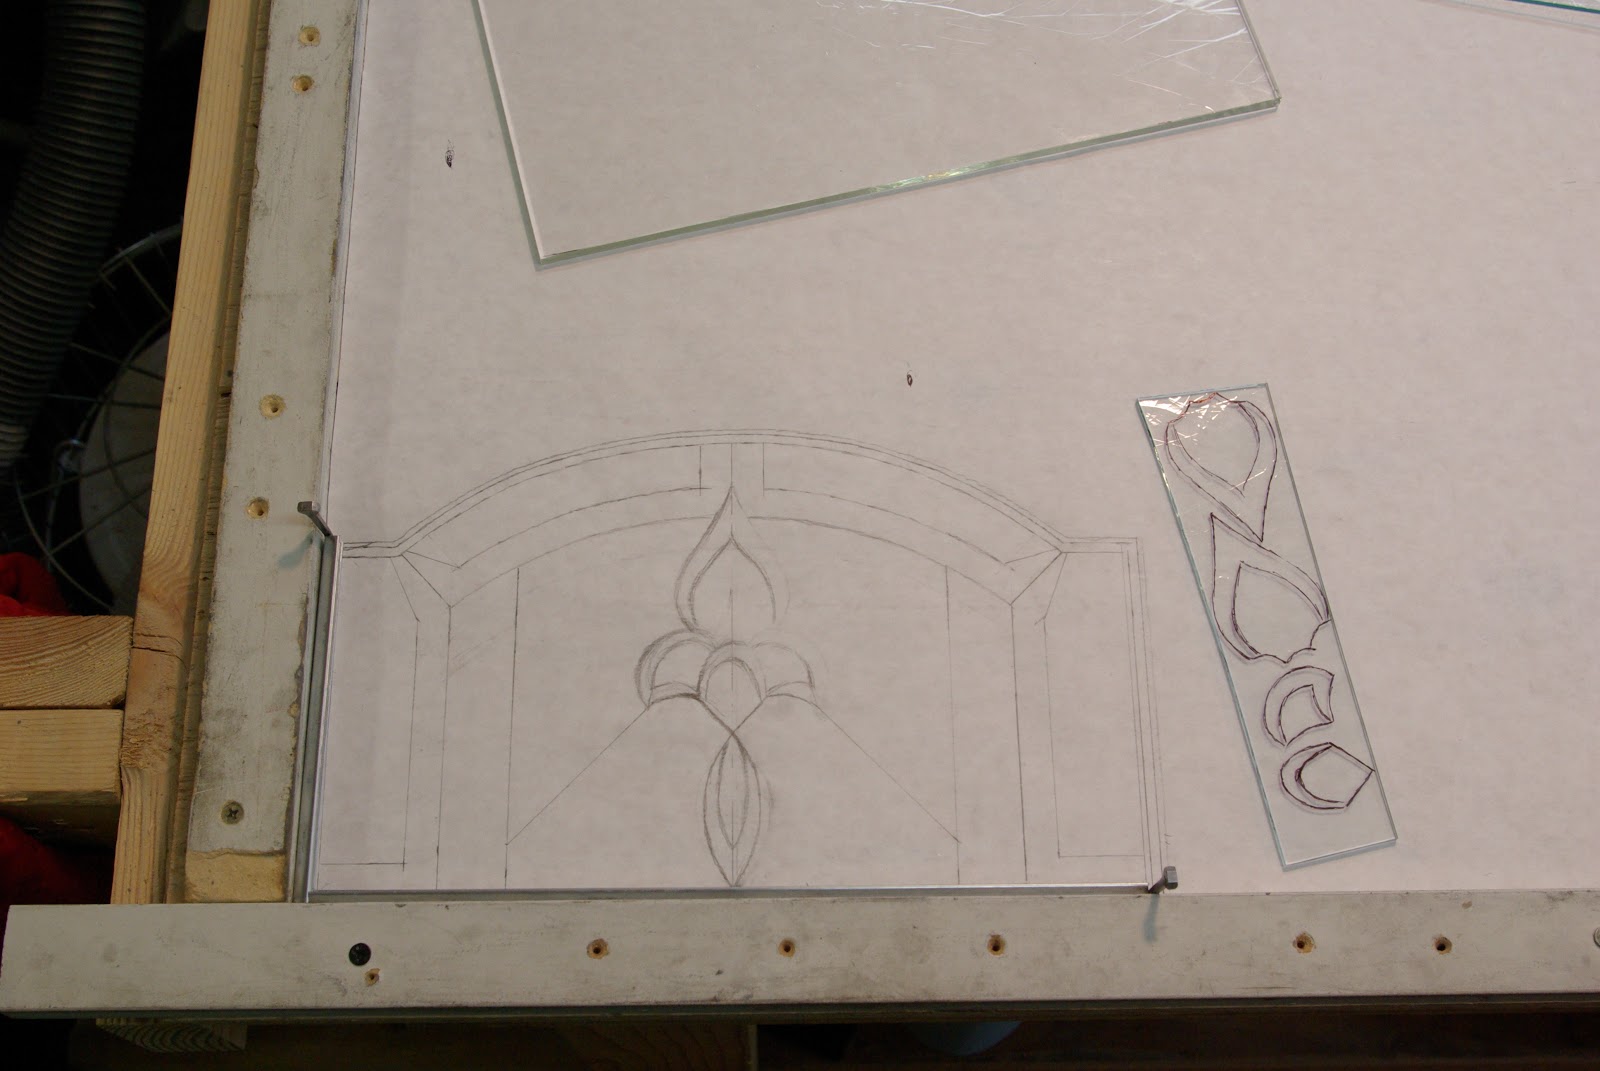
Leaded glass window process, step 1
The first step is to set up a right angle corner and lay out a sheet of paper to draw the design on. I tend to also draw the bevels that I will be making. The glass piece on the side shows 5 of the 9 shapes that will be hand beveled.
Labels:
beveled glass,
hand beveled glass,
leaded glass,
Stained glass
Sunday, September 26, 2010
My father in law passed away
Today my father in law passed away which was unexpected and has caused a lot of grief in the family. He was a wonderful man. He accepted me into his family and I really enjoyed spending time with him. We had a language barrier but we seemed to communicate well. We picked on each other and had lots of laughs. He will be dearly missed.
![]() |
| Otosan and I installing a stained glass window. |
Thursday, September 23, 2010
Wednesday, September 22, 2010
2 Entry Ways
The following images are of stained glass in 2 entry ways in a house under construction. The bottom right will be filled in with a stained glass panel. It is a good example of how the reeded glass distorts the field behind. The idea for the design came from the surrounding alfalfa and grass fields, blades of grass being blown in the wind. Hand beveled and bonded glass throughout.
The sidelight in the next image is approx. 93" tall to help give some perspective to the size. There is a blue tarp behind the glass.
The next image is a detail.
The sidelight in the next image is approx. 93" tall to help give some perspective to the size. There is a blue tarp behind the glass.
The next image is a detail.
Labels:
abstract,
art glass,
contemporary,
flowing,
hand beveled glass,
painterly,
Stained glass
Monday, September 13, 2010
Hand drawn designs for stained glass
The following images show designs that I have drawn and presented to a client. These are a little dark (I apologize).
I will show the client hand drawn images (the actual drawings are better than the pictures-I am not proficient at changing the image to look good on computer) and show glass samples to coincide with the image. Sometimes I will color in areas to give example of where certain colors will go.
Labels:
abstract,
contemporary,
drawing,
oil painting,
Stained glass
Wednesday, September 8, 2010
Tuesday, September 7, 2010
Painting or Drawing?
I had someone comment about this painting saying that he wished it were all painting and not looking like both painting and drawing. Why can't a painting have both qualities?
I think that one thing that be said about my work is that it has bot painterly and drawing styles.
Labels:
abstract,
contemporary,
drawing,
oil painting
Wednesday, September 1, 2010
Images and similarities of the Palouse and my paintings
Moving to the Palouse area I notice similarities between the rolling hills, shadows and my painting.
Subscribe to:
Posts (Atom)